

Online privacy and security are of utmost importance in today’s digital world. A virtual private network (VPN) is a great way to increase your online security. Bitdefender, an industry leader in cybersecurity, created this VPN service to protect your information from malicious actors, online ads, and hackers. It is a powerful tool that encrypts your internet connection and hides your IP address to safeguard your online privacy.
This blog provides a quick and easy guide on how to use Bitdefender VPN on any device you may have to ensure security and protection.
Table of Contents
Features of Bitdefender VPN
Secure web browsing on public Wi-Fi, unfettered access to material across locations, and security against data theft are just a few of the important features of Bitdefender VPN. Thanks to its extensive network of servers in different countries, users may easily circumvent geo-restrictions and access material regardless of location.
Learn about some of the most common types of network security protections, how they work, and the top products and services to consider in each category.
Using BitDefender on Windows
Improving online privacy and security is as easy as installing Bitdefender VPN on Windows. Click on the product page, go to Bitdefender Central, or use your Bitdefender security solution to acquire the Bitdefender VPN app. A version of Windows that is more recent than Windows 7 with Service Pack 1 is necessary.
Installing from the Product Page
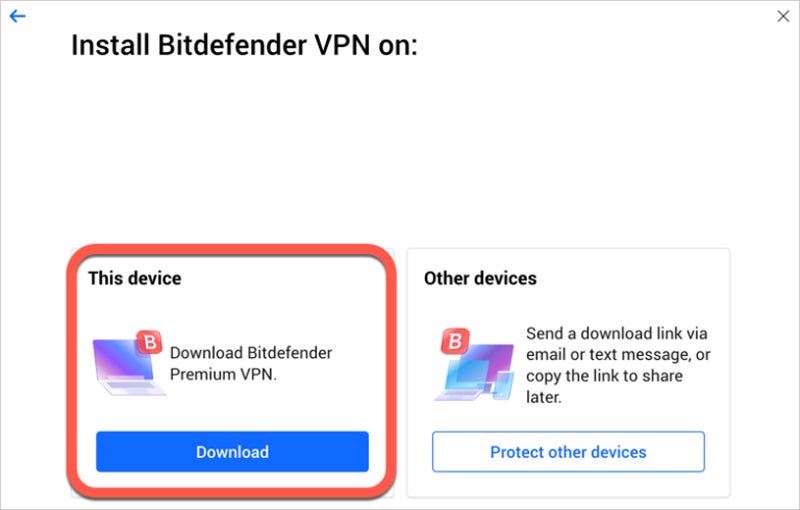
- Open the installer page on the computer where you want to install Bitdefender VPN.
- When asked, save the Bitdefender installation to your computer.
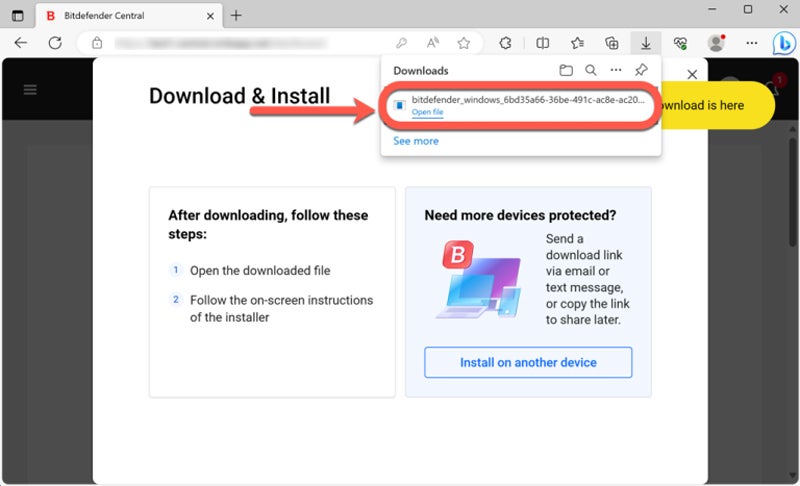
- Launch the installation by double-clicking the bitdefender_vpn file you saved.
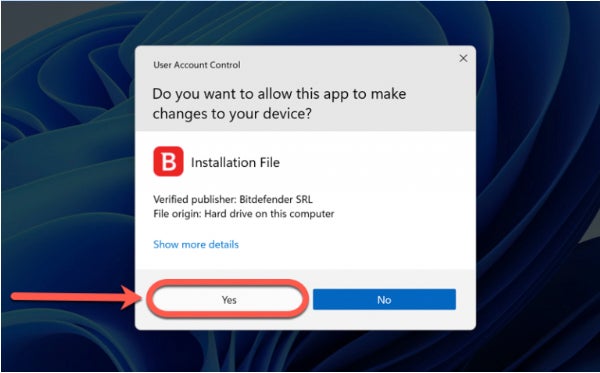
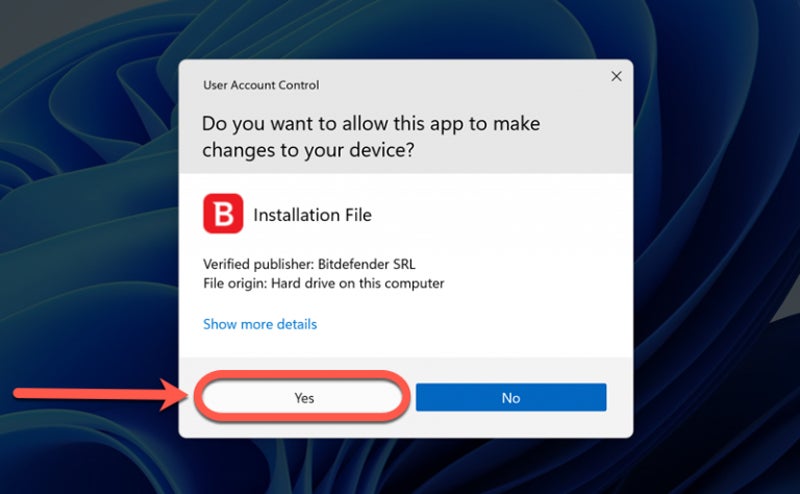
- Once the User Account Control dialog box appears, choose Yes.
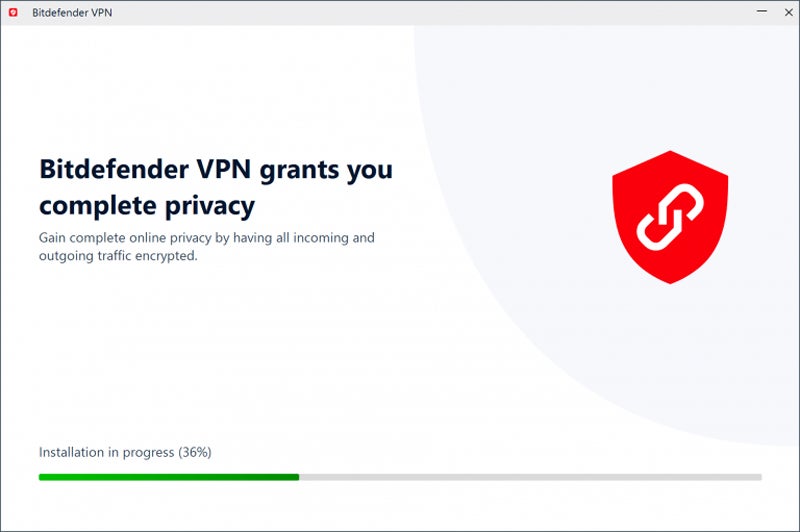
- Wait for Bitdefender VPN to download all the necessary files.
- Once the download is complete, pick your desired language from the installer’s drop-down box.

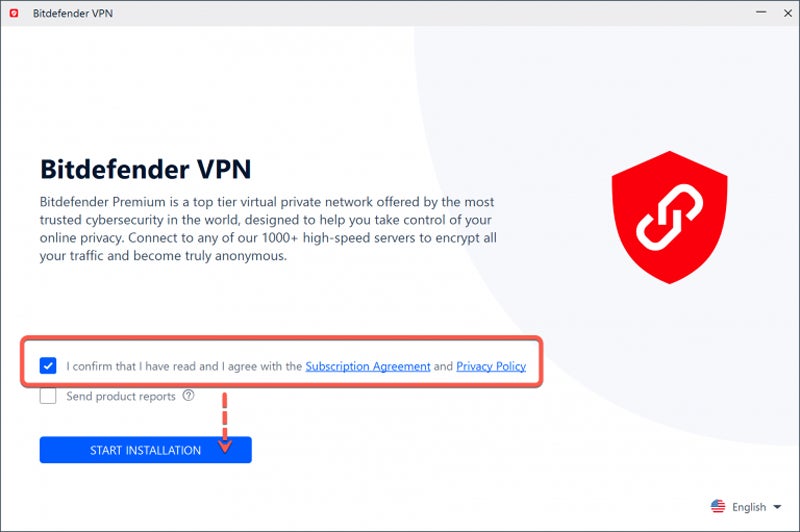
- After reading and agreeing to the Subscription Agreement, tick the applicable box and click START INSTALLATION.

- Wait until the VPN has finished installing on the hard disk.
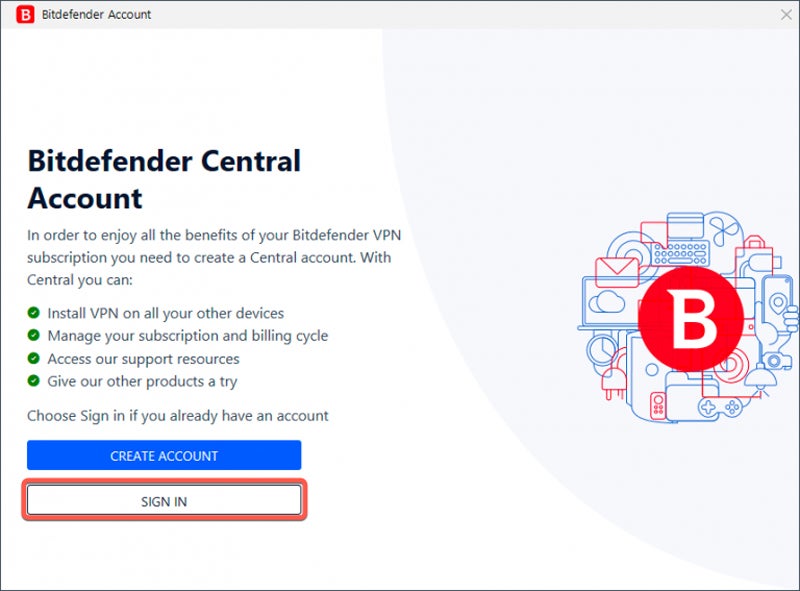
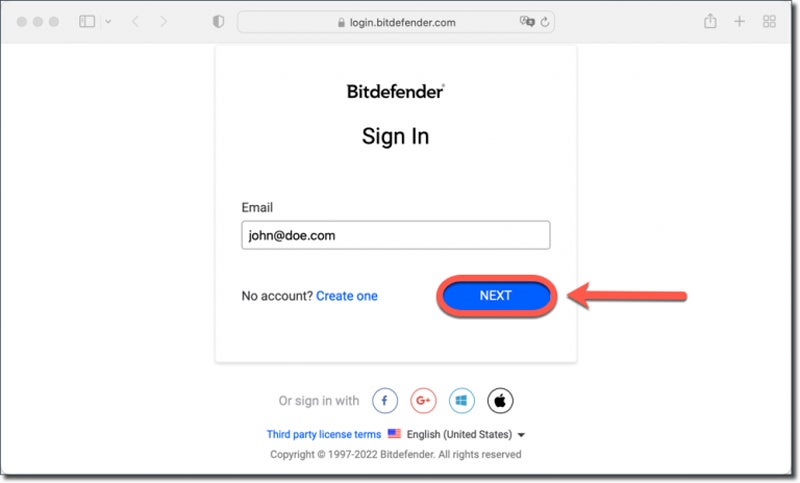
- After the installation, SIGN IN to your Bitdefender Central account using your username and password.
Note: If you do not already have an account, please create one.
- If you do not have an active Bitdefender Premium VPN subscription in your Bitdefender account, you have three options:
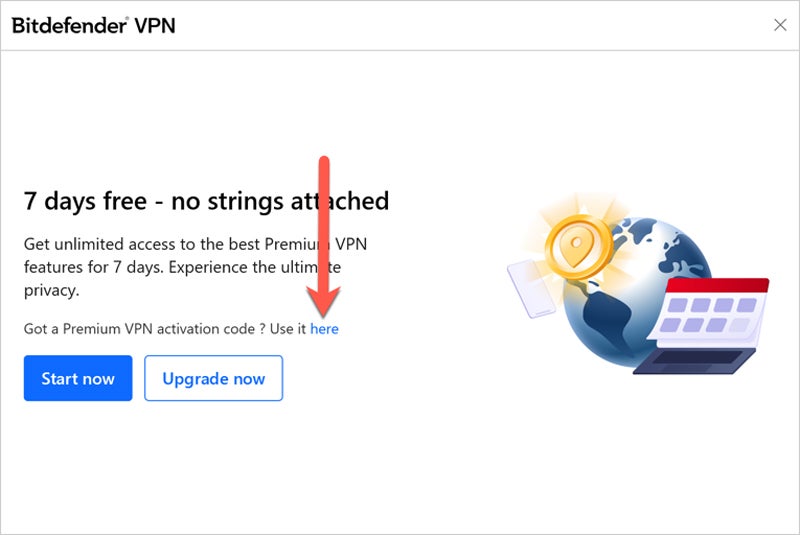
- Click on Start now to begin a 7-day trial of Bitdefender VPN, which includes access to all premium features.
- Select Upgrade now to get Bitdefender Premium VPN.
- To begin using your Bitdefender Premium VPN membership, click Use it here, input the code from your purchase email, and click Activate code.

Bitdefender VPN is installed and ready to use.
Installing via Bitdefender Central
Bitdefender Central also lets you install the Bitdefender VPN software.
- Log in to your Bitdefender Central account on the computer you wish to install the VPN on.
Note: Please create an account if you do not already have one.
- Select Install Bitdefender Products from the Bitdefender Central homepage.

- You will see all of the Bitdefender subscription items in a new window that opens. Click the Install button on the VPN panel within this window.

- Choose Download to save the Bitdefender installer.
- Once the download is done, open the file named bitdefender_windows_[…] to start the installation.
- From the User Account Control dialog box, select Yes.
- Wait until all the necessary files are downloaded.
- Once complete, choose the language from the drop-down menu on the installer.

- Read and agree to the subscription agreement, check the corresponding box, and click START INSTALLATION.
- Let the VPN finish installing, then SIGN IN to your Bitdefender Central account with your username and password.

- If you do not have an active Bitdefender Premium VPN subscription in your Bitdefender account, you have three options:
- Click on Start now to begin a 7-day trial of Bitdefender VPN, which includes access to all premium features.
- Select Upgrade now to get Bitdefender Premium VPN.
- To begin using your Bitdefender Premium VPN membership, click Use it here, input the code from your purchase email, and click Activate code.
Bitdefender VPN is installed and ready to use.
Installing via Bitdefender Security Solution
You may install Bitdefender VPN with the security solution if you already have Bitdefender Total Security, Bitdefender Internet Security, or Bitdefender Antivirus Plus installed on your Windows PC.
- Select Privacy from the Bitdefender interface’s left sidebar.
- Select Install VPN from the VPN toolbar.
- After you’ve read the subscription agreement in the popup that describes the VPN program, click Install Bitdefender VPN.
- After completing the steps in this guide, Bitdefender VPN will be installed on your Windows PC.
Using BitDefender on MacOS
When installing Bitdefender Antivirus for Mac, it is necessary to have an updated version of MacOS Sierra (10.12). This helps ensure more robust network security for your Mac.
Installing from the Product Page
- Open the installer page on the Mac where you want to install Bitdefender VPN.
- Save the bitdefender_vpn file on your Mac when prompted.
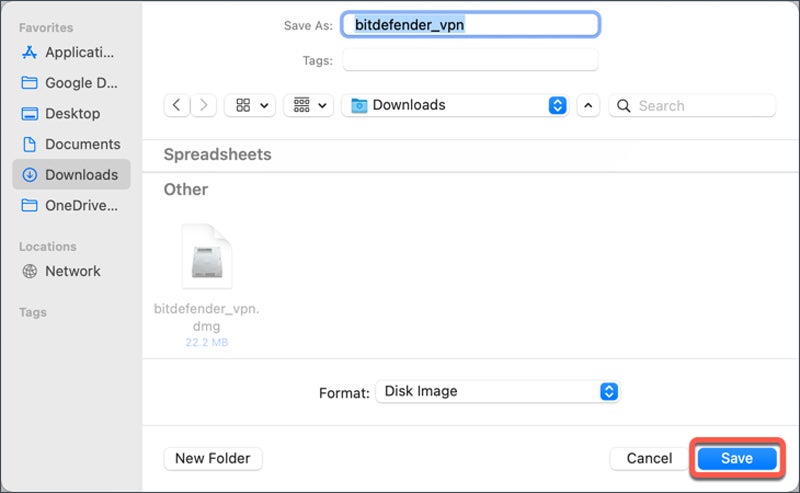
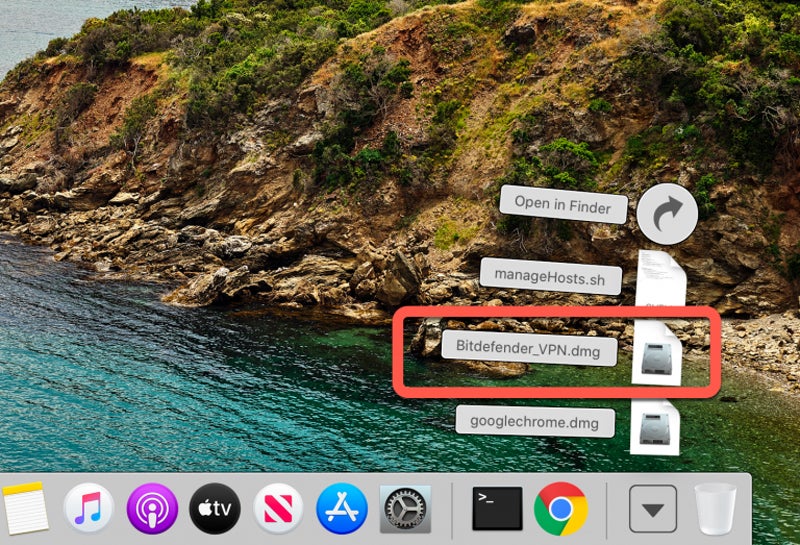
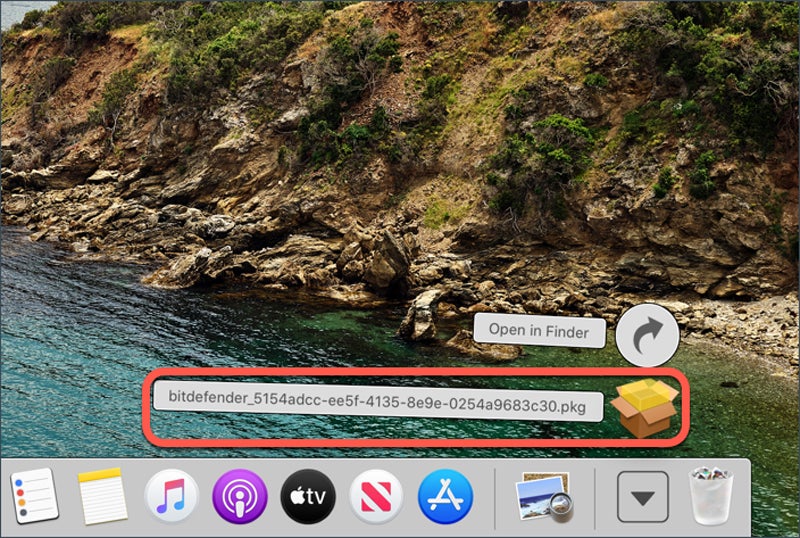
- When the download is ready, double-click the bitdefender_vpn to begin the installation.
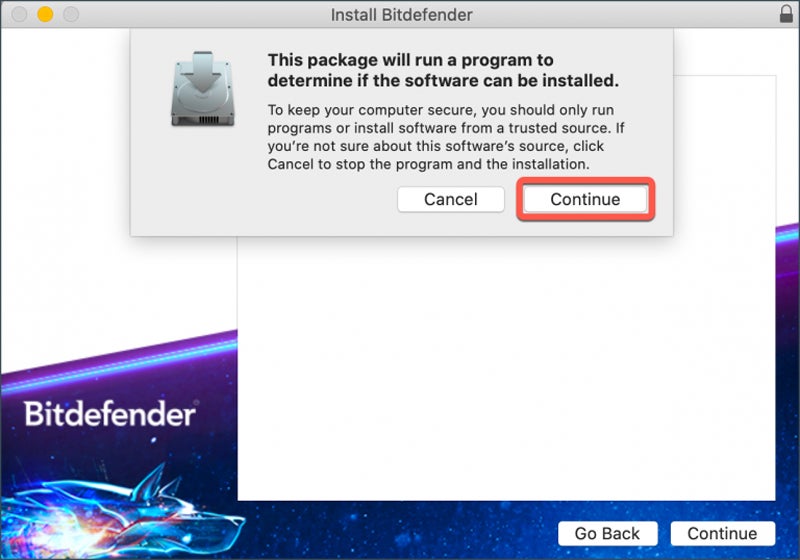
- Follow the on-screen instructions, then click the Continue button.
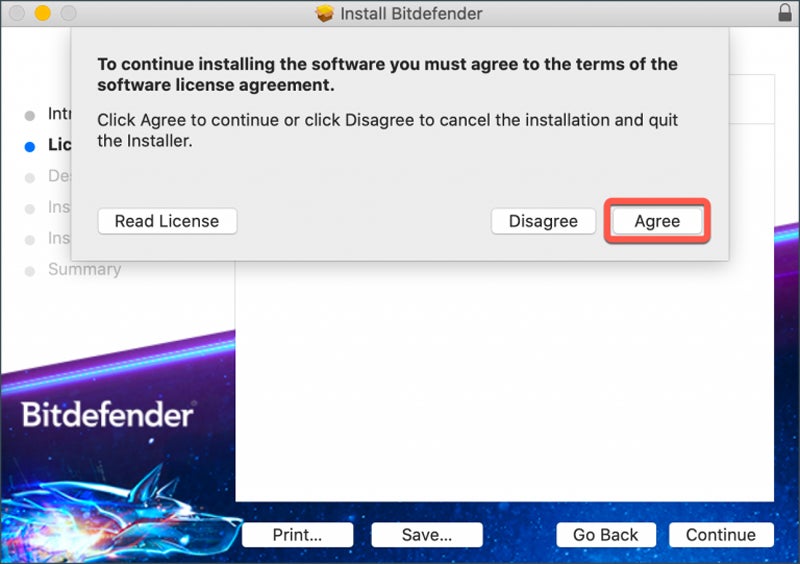
- Click Agree after you have read and agreed to the software license agreement terms.
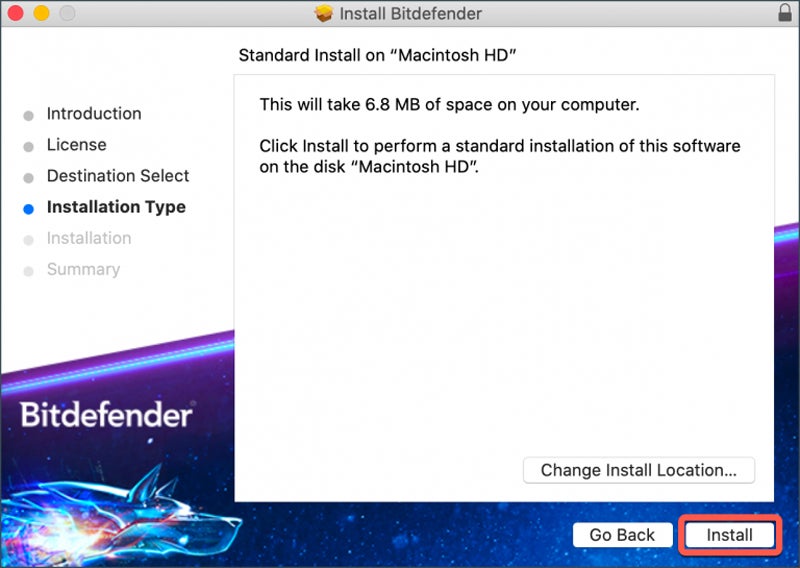
- Click Install.
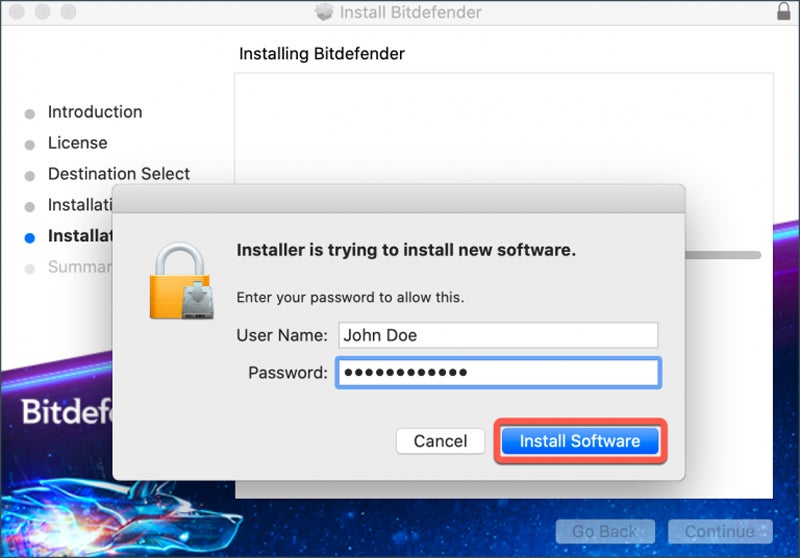
- Enter an administrator username and password, click Install Software, and wait until the installation completes.
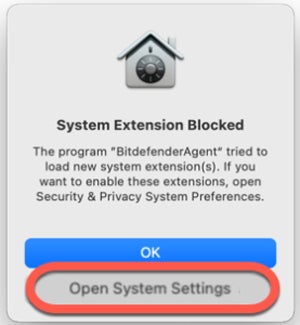
- Wait until you receive a pop-up indicating a blocked system extension. Click Open System Settings (or Open Security Preferences on earlier macOS versions).
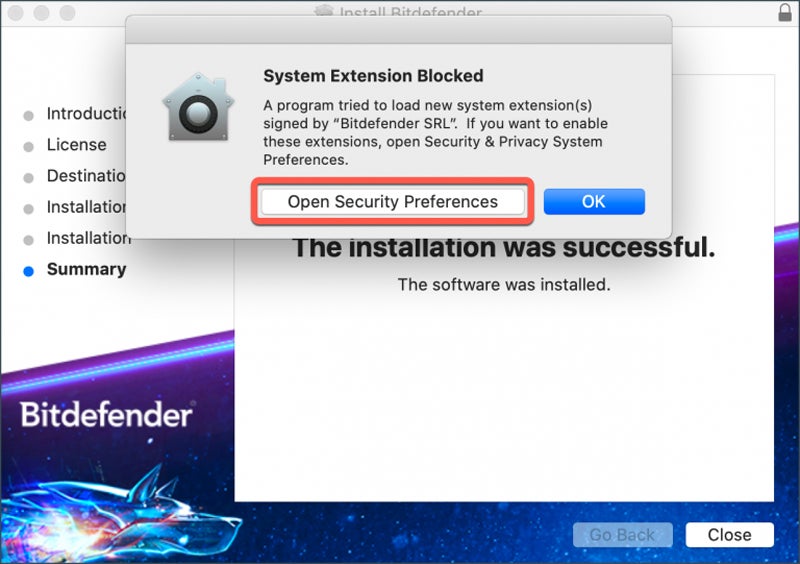
- Click Allow, then input an administrator name and password to unlock settings.

Note: On earlier macOS versions (High Sierra 10.13 to Monterey 12), first click the padlock in the bottom left corner of the Security & Privacy window, enter an administrator name and password, and then click the Allow button.

- Launch Bitdefender VPN using the small shield-shaped
icon in the upper-right corner of your Mac’s screen.
Upon launching the application for the first time, you’ll be prompted to either sign in or create a Bitdefender account if you don’t have one.

- If you do not have an active Bitdefender Premium VPN subscription in your Bitdefender account, you have three options:
- Click on Start now to begin a 7-day trial of Bitdefender VPN, which includes access to all premium features.
- Select Upgrade now to get Bitdefender Premium VPN.
- To begin using your Bitdefender Premium VPN membership, click Use it here, input the code from your purchase email, and click Activate code.

You’re done! Bitdefender VPN is installed and ready to be used.
Installing via Bitdefender Central
- Log in to your Bitdefender Central account on the Mac you wish to install the VPN.
Note: Please create an account if you do not have one.

- On the Bitdefender Central homepage, click Install Bitdefender Products.

- From the window displaying the Bitdefender subscription products, press Install, which is located in the VPN panel.

- Choose Download to save the installer to your Mac.

- Once the download is done, double-click the bitdefender_[…] file to start the installation.
- Follow the on-screen instructions, then click Continue.

- Read and agree to the subscription agreement, and click Agree.

- Click Install.

- Enter an administrator username and password, click Install Software, and wait until the installation completes.

- Wait until you receive a pop-up indicating a blocked system extension. Click Open System Settings (or Open Security Preferences on earlier macOS versions).


- Click Allow, then input an administrator name and password to unlock settings.

Note: On earlier macOS versions (High Sierra 10.13 to Monterey 12), first click the padlock in the bottom left corner of the Security & Privacy window, enter an administrator name and password, and then click the Allow button.

- Launch Bitdefender VPN using the small shield-shaped
icon in the upper-right corner of your Mac’s screen.
Upon launching the application for the first time, you’ll be prompted to either sign in or create a Bitdefender account if you don’t have one.

- If you do not have an active Bitdefender Premium VPN subscription in your Bitdefender account, you have three options:
- Click on Start now to begin a 7-day trial of Bitdefender VPN, which includes access to all premium features.
- Select Upgrade now to get Bitdefender Premium VPN.
- To begin using your Bitdefender Premium VPN membership, click Use it here, input the code from your purchase email, and click Activate code.

You’re done! Bitdefender VPN is installed and ready to be used on your Mac.
Installing via Bitdefender Antivirus for Mac
If Bitdefender Antivirus for Mac currently protects your Mac, you may install Bitdefender VPN using the security solution.
- On the left sidebar of the Bitdefender interface, click the Privacy icon.
- In the VPN tab, click Install.
You’re done! Bitdefender VPN is installed and ready to be used on your Mac.
Using BitDefender on Android
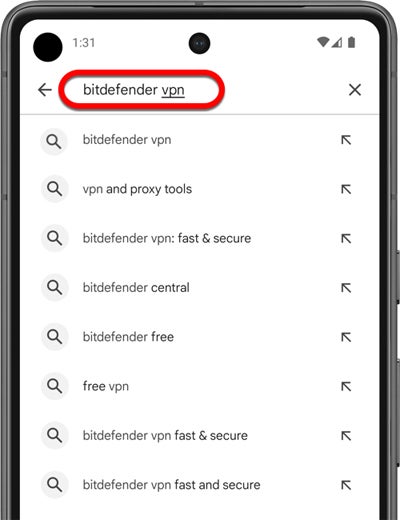
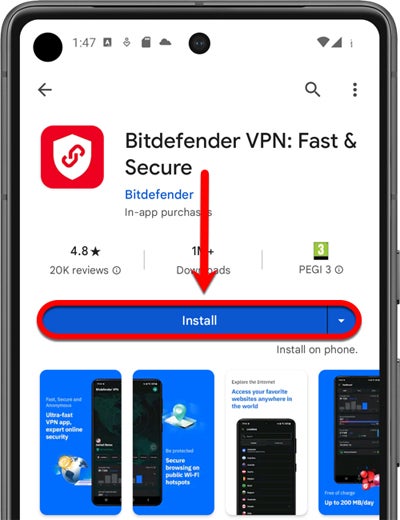
- Open the Google Play Store on your Android smartphone or tablet.
- In the search bar at the top, type bitdefender vpn, then tap Enter or the search icon.
- In the search results, tap on the Bitdefender VPN app. It should be published by “Bitdefender.”
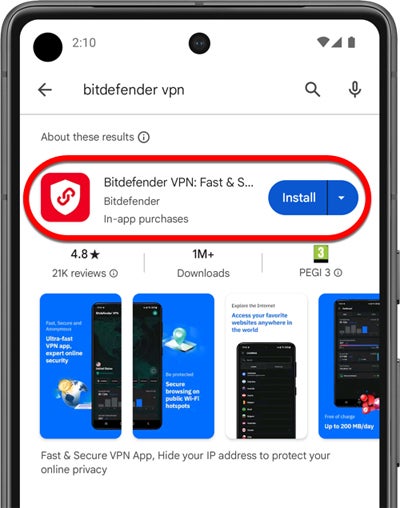
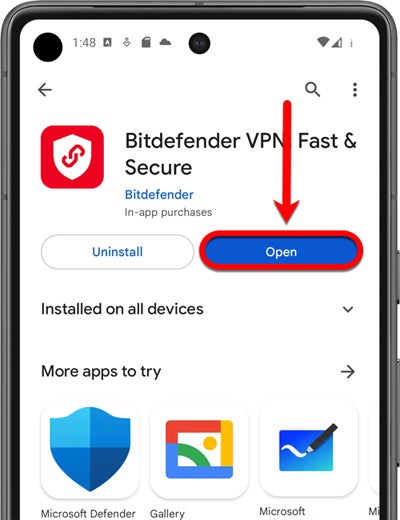
- On the app’s details page, tap Install. It will start downloading and installing.
- Once the installation is complete, tap Open to launch the Bitdefender VPN app.
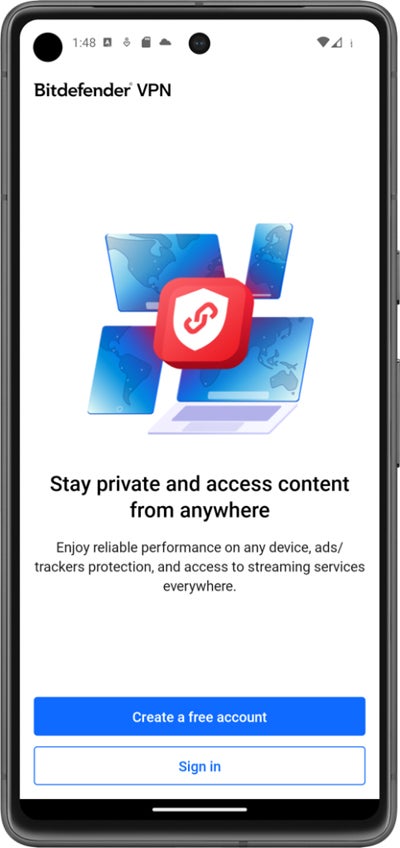
- When you open the app for the first time, you’ll need to sign in or create a Bitdefender account if you don’t have one.
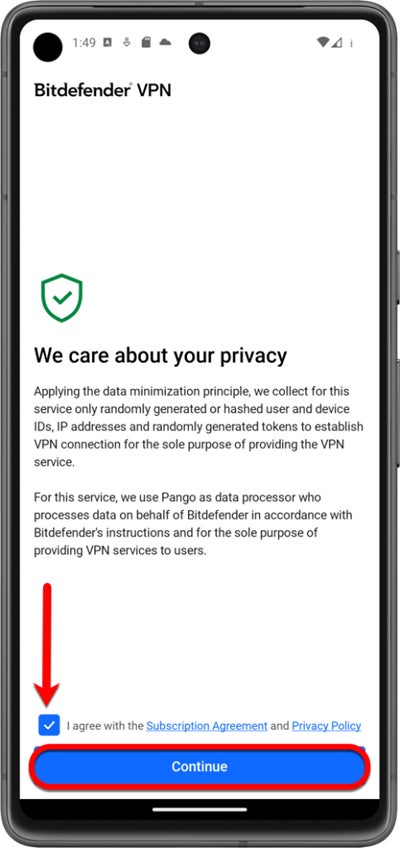
- Check the small box and tap Continue after you read and agree with the subscription agreement & privacy policy.
- If you do not have an active Bitdefender Premium VPN subscription in your Bitdefender account, you have three options:
- Click on Start now to begin a 7-day trial of Bitdefender VPN, which includes access to all premium features.
- Select Upgrade now to get Bitdefender Premium VPN.
- To begin using your Bitdefender Premium VPN membership, click Use it here, input the code from your purchase email, and click Activate code.
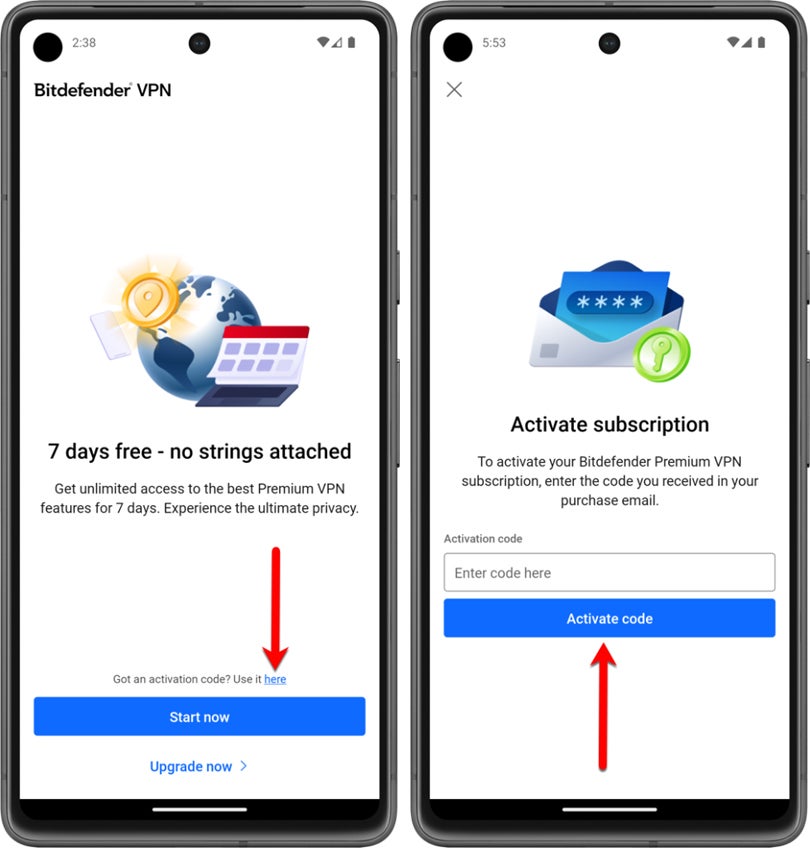
Activation
To activate the subscription, go to the email you received after buying Bitdefender Premium VPN and click ACTIVATE SUBSCRIPTION.

Alternatively, you can activate the subscription directly from the VPN interface:
- Input your username in the top right corner of the Bitdefender VPN app.
- Tap your email and then tap Have an activation code?
- Enter the activation code from the purchase email and click Activate code.
You’re done! Bitdefender VPN is now successfully installed and activated on your Android device.
Using BitDefender on iOS
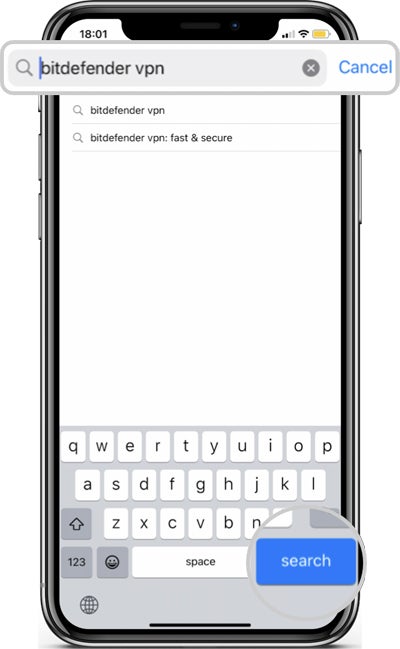
- On your iPhone or iPad, open the App Store app.
- In the search bar at the top, type bitdefender vpn and then tap the search key.
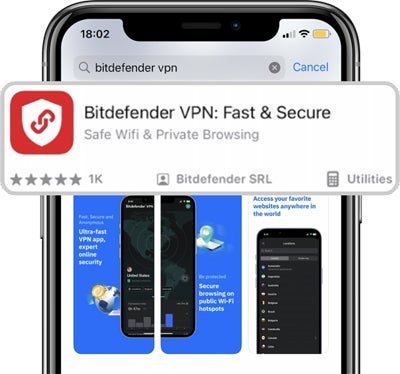
- In the search results, tap the Bitdefender VPN app. It should be published by “Bitdefender SRL.”
- On the app’s details page, tap the cloud icon with an arrow pointing down. The app will start downloading and installing.

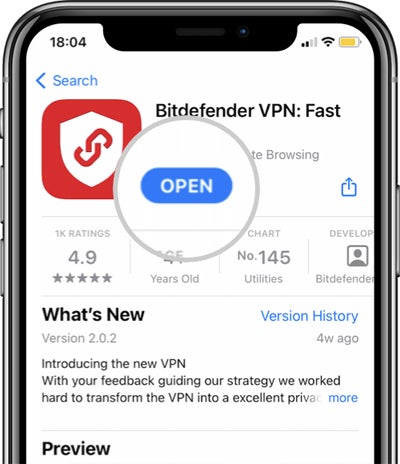
- Once the installation is complete, tap Open to launch the Bitdefender VPN app.
- When you open the app for the first time, you’ll need to sign in or create a Bitdefender account if you don’t have one.
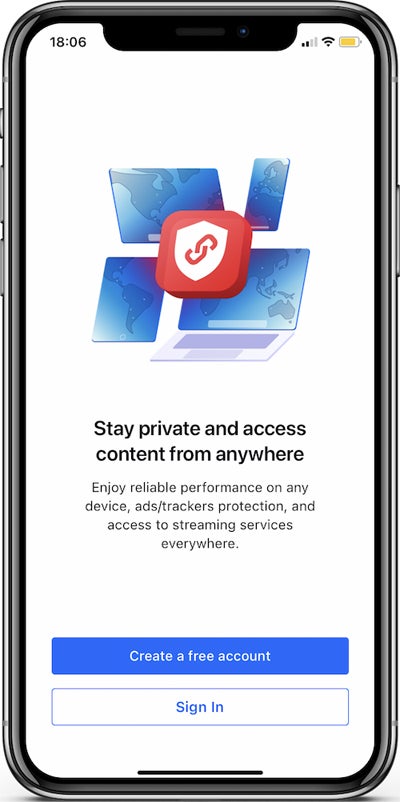
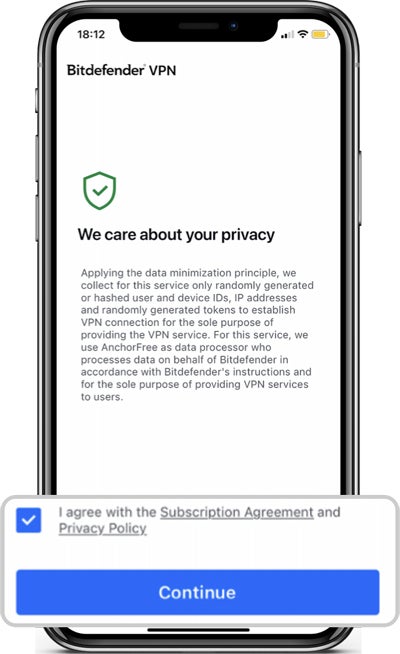
- Check the small box and tap Continue after you read and agree with the subscription agreement & privacy policy.
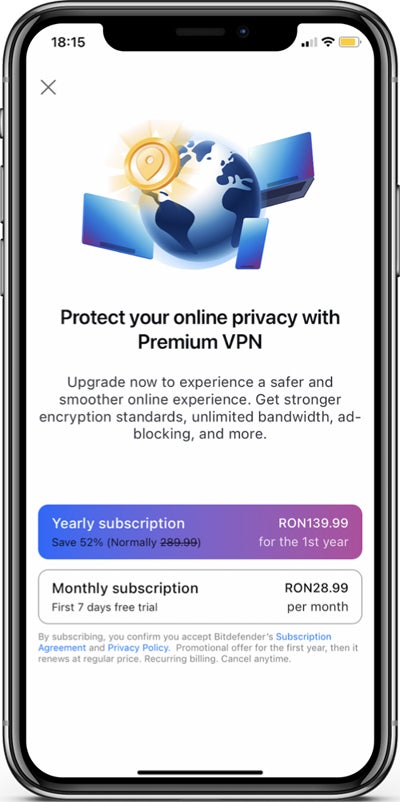
- At this point, if the Bitdefender Premium VPN subscription isn’t already active in your Bitdefender account, tap on ‘x’ in the top left corner.
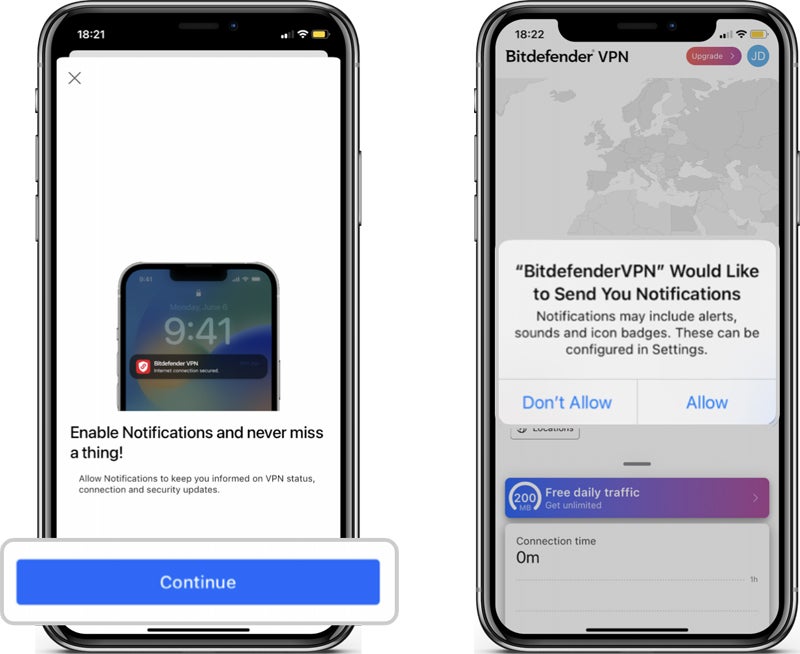
- Tap Continue, then choose whether or not you want to receive Bitdefender VPN notifications.
Activation
To activate the subscription, go to the email you received after buying Bitdefender Premium VPN and click ACTIVATE SUBSCRIPTION.

You’re done! Bitdefender VPN is now successfully installed and activated on your iOS device.
Bottom Line: Bitdefender Provides Added Protection and Security
The need to safeguard personal information and preserve privacy is growing in light of the ever-changing nature of cyberthreats. Whether at home, on public Wi-Fi, or overseas, Bitdefender VPN encrypts your internet connection and keeps your online activities private and safe. It’s a dependable and easy-to-use solution.